The SeeedStudio T1000-A/B is a LoRaWAN-based GPS tracker that can be used with the Traccar GPS tracking platform when paired with The Things Network (TTN). In this post, I will show you how to set up the T1000 with TTN and Traccar.
Initial Setup
You can follow the official instructions on the SeeedStudio wiki to set up your T1000 with TTN: SeeedStudio T1000 LoRaWAN GPS Tracker. This will involve creating an account on TTN, registering your device, and configuring the device to connect to TTN.
If you haven’t already setup Traccar, you can follow their official quick start guide: Traccar Quick Start Guide.
Setting up the Payload Formatter on TTN
Once your device is sending data to TTN, you will need to set up a payload formatter to convert the raw data from the T1000 into a format that Traccar can understand. SeeedStudio’s default payload formatter is not compatible with Traccar, so you will need to specify a custom payload formatter.
I have created a custom payload formatter that converts the T1000’s payload into a simple JSON format that Traccar can parse:
| /* | |
| * Steve-Tech's custom SenseCAP T1000-A/B decoder for The Things Network | |
| * Designed with Traccar in mind, however not all fields are directly mappable. | |
| */ | |
| function getMacAddr(input, index) { | |
| let mac = ""; | |
| for (let i = 0; i < 6; i++) { | |
| mac += input.bytes[index + i].toString(16); | |
| if (i < 5) mac += ":"; | |
| } | |
| return mac; | |
| } | |
| function validateMacAddr(input, index) { | |
| // It seems all 0xff MAC addresses mean "no MAC" | |
| let invalid = 0xff; | |
| for (let i = 0; i < 6; i++) { | |
| invalid &= input.bytes[index + i]; | |
| } | |
| return invalid !== 0xff; | |
| } | |
| function getSigned32(input, index) { | |
| if (input.bytes[index] & 0x80) { | |
| return -((~((input.bytes[index] << 24) | (input.bytes[index + 1] << 16) | (input.bytes[index + 2] << 8) | input.bytes[index + 3]) + 1) & 0xffffffff); | |
| } else { | |
| return (input.bytes[index] << 24) | (input.bytes[index + 1] << 16) | (input.bytes[index + 2] << 8) | input.bytes[index + 3]; | |
| } | |
| } | |
| function decodeUplink(input, output = {"packetIds": []}, warnings = []) { | |
| if (input['fPort'] === 199 || input['fPort'] === 192) | |
| return {data: {}}; | |
| if (input['fPort'] !== 5) | |
| return {errors: ["Unknown FPort. Expected 5, got " + input['fPort'] + "."]}; | |
| let i = 0; | |
| let dataid = input.bytes[i++]; | |
| let length = input.bytes.length; | |
| let packetTypes = { | |
| 0x01: ["Status - Event Mode", 47], | |
| 0x02: ["Status - Periodic Mode", 16], | |
| 0x03: ["Status - Event (Reply)", 32], | |
| 0x04: ["Status - Intervals (Reply)", 10], | |
| 0x05: ["Heartbeat", 5], | |
| 0x06: ["GNSS Location and Sensor", 22], | |
| 0x07: ["WiFi Location and Sensor", 42], | |
| 0x08: ["Bluetooth Location and Sensor", 35], | |
| 0x09: ["GNSS Location", 18], | |
| 0x0A: ["WiFi Location", 38], | |
| 0x0B: ["Bluetooth Location", 31], | |
| 0x0D: ["Errors", 5], | |
| 0x11: ["Positioning Status and Sensor", 14], | |
| }; | |
| if (!packetTypes.hasOwnProperty(dataid)) | |
| return {warnings: [`Unknown Data ID: 0x${dataid.toString(16)}`]}; | |
| if (length < packetTypes[dataid][1]) | |
| return {warnings: [`Payload too short for Data ID 0x${dataid.toString(16)}. Expected at least ${packetTypes[dataid][1]} bytes, got ${length} bytes.`]}; | |
| output["packetIds"].push(packetTypes[dataid][0]); | |
| switch (dataid) { | |
| case 0x01: | |
| case 0x02: | |
| output["batteryLevel"] = input.bytes[i++]; | |
| output["softwareVersion"] = input.bytes[i++] + "." + input.bytes[i++]; | |
| output["hardwareVersion"] = input.bytes[i++] + "." + input.bytes[i++]; | |
| output["workMode"] = ["Standby", "Periodic", "Event"][input.bytes[i++]]; | |
| output["positioningStrategy"] = [ | |
| "GNSS", | |
| "WiFi", | |
| "WiFi+GNSS", | |
| "GNSS+WiFi", | |
| "Bluetooth", | |
| "Bluetooth+WiFi", | |
| "Bluetooth+GNSS", | |
| "Bluetooth+WiFi+GNSS", | |
| ][input.bytes[i++]]; | |
| output["heartbeatInterval"] = input.bytes[i++] << 8 | input.bytes[i++]; | |
| output["uplinkInterval"] = input.bytes[i++] << 8 | input.bytes[i++]; | |
| output["eventModeUplinkInterval"] = input.bytes[i++] << 8 | input.bytes[i++]; | |
| output["tempAndLightSwitch"] = Boolean(input.bytes[i++]); | |
| output["sosMode"] = ["Single", "Continuous"][input.bytes[i++]]; | |
| // Periodic Mode stops here, Event Mode continues | |
| if (dataid === 0x02) | |
| break; | |
| // fallthrough | |
| case 0x03: | |
| output["enableMotionEvent"] = Boolean(input.bytes[i++]); | |
| output["3axisMotionThreshold"] = input.bytes[i++] << 8 | input.bytes[i++]; | |
| output["motionStartInterval"] = input.bytes[i++] << 8 | input.bytes[i++]; | |
| output["enableMotionlessEvent"] = Boolean(input.bytes[i++]); | |
| output["motionlessTimeout"] = input.bytes[i++] << 8 | input.bytes[i++]; | |
| output["enableShockEvent"] = Boolean(input.bytes[i++]); | |
| output["3axisShockThreshold"] = input.bytes[i++] << 8 | input.bytes[i++]; | |
| output["enableTemperatureEvent"] = Boolean(input.bytes[i++]); | |
| output["temperatureEventUplinkInterval"] = input.bytes[i++] << 8 | input.bytes[i++]; | |
| output["temperatureSampleInterval"] = input.bytes[i++] << 8 | input.bytes[i++]; | |
| output["temperatureThresholdMax"] = input.bytes[i++] << 8 | input.bytes[i++]; | |
| output["temperatureThresholdMin"] = input.bytes[i++] << 8 | input.bytes[i++]; | |
| output["temperatureThresholdRule"] = ["Below min", "Above max", "Outside range", "Inside range"][input.bytes[i++]]; | |
| output["enableLightEvent"] = Boolean(input.bytes[i++]); | |
| output["lightEventUplinkInterval"] = input.bytes[i++] << 8 | input.bytes[i++]; | |
| output["lightSampleInterval"] = input.bytes[i++] << 8 | input.bytes[i++]; | |
| output["lightThresholdMax"] = input.bytes[i++] << 8 | input.bytes[i++]; | |
| output["lightThresholdMin"] = input.bytes[i++] << 8 | input.bytes[i++]; | |
| output["lightWarningType"] = ["Below min", "Above max", "Outside range", "Inside range"][input.bytes[i++]]; | |
| break; | |
| case 0x04: | |
| output["workMode"] = ["Standby", "Periodic", "Event"][input.bytes[i++]]; | |
| i++; // Skipped? | |
| output["heartbeatInterval"] = input.bytes[i++] << 8 | input.bytes[i++]; | |
| output["uplinkInterval"] = input.bytes[i++] << 8 | input.bytes[i++]; | |
| output["eventModeUplinkInterval"] = input.bytes[i++] << 8 | input.bytes[i++]; | |
| output["sosMode"] = ["Single", "Continuous"][input.bytes[i++]]; | |
| break; | |
| case 0x05: | |
| output["batteryLevel"] = input.bytes[i++]; | |
| output["workMode"] = ["Standby", "Periodic", "Event"][input.bytes[i++]]; | |
| output["positioningStrategy"] = [ | |
| "GNSS", | |
| "WiFi", | |
| "WiFi+GNSS", | |
| "GNSS+WiFi", | |
| "Bluetooth", | |
| "Bluetooth+WiFi", | |
| "Bluetooth+GNSS", | |
| "Bluetooth+WiFi+GNSS", | |
| ][input.bytes[i++]]; | |
| output["sosMode"] = ["Single", "Continuous"][input.bytes[i++]]; | |
| break; | |
| case 0x06: | |
| case 0x07: | |
| case 0x08: | |
| case 0x09: | |
| case 0x0A: | |
| case 0x0B: | |
| i += 2; | |
| output["alarm"] = ""; | |
| if (input.bytes[i] & 0x01) output["alarm"] += "movement,"; | |
| // if (input.bytes[i] & 0x02) output["alarm"] += "endMovement,"; | |
| if (input.bytes[i] & 0x04) output["alarm"] += "motionless,"; | |
| if (input.bytes[i] & 0x08) output["alarm"] += "shock,"; | |
| if (input.bytes[i] & 0x10) output["alarm"] += "temperature,"; | |
| if (input.bytes[i] & 0x20) output["alarm"] += "light,"; | |
| if (input.bytes[i] & 0x40) output["alarm"] += "sos,"; | |
| if (input.bytes[i] & 0x80) output["alarm"] += "general,"; | |
| if (output["alarm"]) | |
| output["alarm"] = output["alarm"].slice(0, -1); // Remove trailing comma | |
| else | |
| output["alarm"] = null; | |
| i++; | |
| output["segment"] = input.bytes[i++]; | |
| output["time"] = new Date((input.bytes[i++] << 24 | input.bytes[i++] << 16 | input.bytes[i++] << 8 | input.bytes[i++]) * 1000).toISOString(); | |
| if ([0x06, 0x09].includes(dataid)) { | |
| output["longitude"] = getSigned32(input, i) / 1000000; | |
| i += 4; | |
| output["latitude"] = getSigned32(input, i) / 1000000; | |
| i += 4; | |
| } else if ([0x07, 0x0A].includes(dataid)) { | |
| output["wifi"] = {}; | |
| if (validateMacAddr(input, i)) | |
| output["wifi"][getMacAddr(input, i)] = {rssi: input.bytes[i + 6] - 256}; | |
| i += 7; | |
| if (validateMacAddr(input, i)) | |
| output["wifi"][getMacAddr(input, i)] = {rssi: input.bytes[i + 6] - 256}; | |
| i += 7; | |
| if (validateMacAddr(input, i)) | |
| output["wifi"][getMacAddr(input, i)] = {rssi: input.bytes[i + 6] - 256}; | |
| i += 7; | |
| if (validateMacAddr(input, i)) | |
| output["wifi"][getMacAddr(input, i)] = {rssi: input.bytes[i + 6] - 256}; | |
| i += 7; | |
| } else if ([0x08, 0x0B].includes(dataid)) { | |
| output["bluetooth"] = {}; | |
| if (validateMacAddr(input, i)) | |
| output["bluetooth"][getMacAddr(input, i)] = {rssi: input.bytes[i + 6] - 256}; | |
| i += 7; | |
| if (validateMacAddr(input, i)) | |
| output["bluetooth"][getMacAddr(input, i)] = {rssi: input.bytes[i + 6] - 256}; | |
| i += 7; | |
| if (validateMacAddr(input, i)) | |
| output["bluetooth"][getMacAddr(input, i)] = {rssi: input.bytes[i + 6] - 256}; | |
| i += 7; | |
| } | |
| if ([0x06, 0x07, 0x08].includes(dataid)) { | |
| output["temp1"] = (input.bytes[i++] << 8 | input.bytes[i++]) / 10; | |
| output["lightLevel"] = input.bytes[i++] << 8 | input.bytes[i++]; | |
| } | |
| output["batteryLevel"] = input.bytes[i++]; | |
| break; | |
| case 0x0D: | |
| if (!output.hasOwnProperty("errorCodes")) | |
| output["errorCodes"] = []; | |
| output["errorCodes"].push(input.bytes[i++] << 24 | input.bytes[i++] << 16 | input.bytes[i++] << 8 | input.bytes[i]); | |
| if (!output.hasOwnProperty("errorTexts")) | |
| output["errorTexts"] = []; | |
| if (input.bytes[i] < 1 || input.bytes[i] > 3) { | |
| warnings.push("Invalid error code value: " + input.bytes[i]); | |
| } else { | |
| output["errorTexts"].push(["UTC time acquisition failed", "Almanac too old", "Doppler error"][input.bytes[i]-1]); | |
| } | |
| i++; | |
| break; | |
| case 0x11: | |
| output["positioningStatus"] = [ | |
| "Positioning successful", | |
| "The GNSS scan timed out and failed to obtain the location.", | |
| "The Wi-Fi scan timed out and failed to obtain the location.", | |
| "The Wi-Fi + GNSS scan timed out and failed to obtain the location.", | |
| "The GNSS + Wi-Fi scan timed out and failed to obtain the location.", | |
| "The Bluetooth scan timed out and failed to obtain the location.", | |
| "The Bluetooth + Wi-Fi scan timed out and failed to obtain the location.", | |
| "The Bluetooth + GNSS scan timed out and failed to obtain the location.", | |
| "The Bluetooth + Wi-Fi + GNSS scan timed out and failed to obtain the location.", | |
| "Location Server failed to parse the GNSS location.", | |
| "Location Server failed to parse the Wi-Fi location.", | |
| "Location Server failed to parse the Bluetooth location.", | |
| "Failed to parse the GNSS location due to the poor accuracy.", | |
| "Time synchronization failed.", | |
| "Failed to obtain positioning due to the old Almanac.", | |
| ][input.bytes[i++]]; | |
| i += 2; | |
| output["alarm"] = ""; | |
| if (input.bytes[i] & 0x01) output["alarm"] += "movement,"; | |
| // if (input.bytes[i] & 0x02) output["alarm"] += "endMovement,"; | |
| if (input.bytes[i] & 0x04) output["alarm"] += "motionless,"; | |
| if (input.bytes[i] & 0x08) output["alarm"] += "shock,"; | |
| if (input.bytes[i] & 0x10) output["alarm"] += "temperature,"; | |
| if (input.bytes[i] & 0x20) output["alarm"] += "light,"; | |
| if (input.bytes[i] & 0x40) output["alarm"] += "sos,"; | |
| if (input.bytes[i] & 0x80) output["alarm"] += "general,"; | |
| if (output["alarm"]) | |
| output["alarm"] = output["alarm"].slice(0, -1); // Remove trailing comma | |
| else | |
| output["alarm"] = null; | |
| i++; | |
| output["time"] = new Date((input.bytes[i++] << 24 | input.bytes[i++] << 16 | input.bytes[i++] << 8 | input.bytes[i++]) * 1000).toISOString(); | |
| output["temp1"] = (input.bytes[i++] << 8 | input.bytes[i++]) / 10; | |
| output["lightLevel"] = input.bytes[i++] << 8 | input.bytes[i++]; | |
| output["batteryLevel"] = input.bytes[i++]; | |
| break; | |
| } | |
| if (length - i > 0) | |
| return decodeUplink({...input, bytes: input.bytes.slice(i)}, output, warnings); | |
| return {data: output, warnings: warnings}; | |
| } |
View Payload Formatter on GitHub Gist
Alternatively, you can use SeeedStudio’s TTN Mapper payload formatter, but that will only display your latitude and longitude, and not any of the sensors or additional information such as battery level or alarms.
Setting up the TTN Webhook for Traccar
Traccar listens for the TTN webhook on port 5261, so you will need to make sure that port is accessible from the internet. You can also use a reverse proxy to achieve this (e.g. I personally use https://traccar-api.example.com/ttn with an API key, but I will only cover the basic setup here). Traccar also only understands JSON currently, and we only want to send uplink messages, so you should configure the webhook like so:
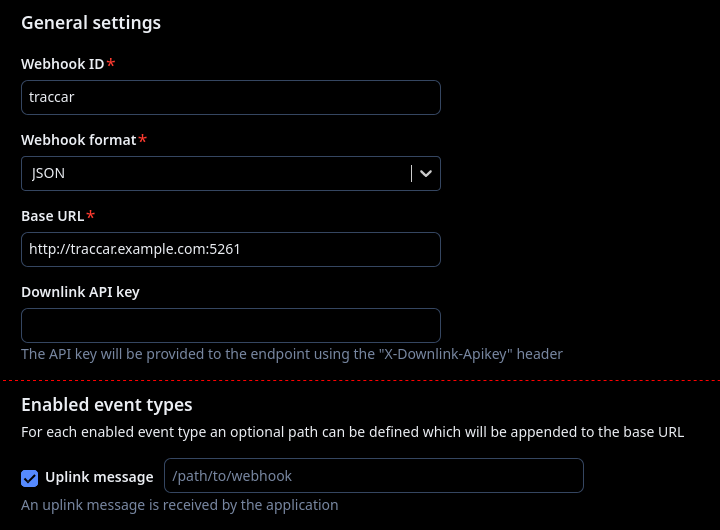
- Webhook ID: This can be anything you want, I use
traccar. - Webhook format: This should be set to
JSON. - Base URL: This should be the URL of your Traccar server, e.g.
http://traccar.example.com:5261. - Enabled event types: You should only select
Uplink messagehere, leave the rest unchecked. The path doesn’t matter, as Traccar will ignore it and just listen for any incoming requests on that port.
Setting up the Device in Traccar
Finally, you will need to add your device to Traccar. You can do this by going to the Traccar web interface, and clicking on the plus (+) icon. The identifier needs to match the ‘End device ID’ you set on the TTN console when you registered your device. You can set the device name and other information as you like.
You should now start seeing data from your T1000 in Traccar! Remember that you will need to wait until its next upload interval.
As the T1000 also supports WiFi scanning, you can also enable an LBS Geolocation API in Traccar to get a location fix when GPS is not available, using the WiFi access points around you.
Enabling Downlink Commands (Optional)
Affiliate Links & Coupons
If you are interested in purchasing a SeeedStudio T1000, you can use the following affiliate links to support my work:
- SeeedStudio T1000-A (with sensors)
- SeeedStudio T1000-B (without sensors)
- SeeedStudio Trackers
- Coupon:
G57NNL2Z- US$2 off your cart
I run no external ads on this blog, and I spent my own money on my T1000-A, so if you found this guide helpful and are considering purchasing a T1000, please click the affiliate links above. It doesn’t cost you anything extra, but it incentivises me to continue improving LoRaWAN support in Traccar, as well as write more guides like this! Alternatively you can also sponsor me on GitHub.
Thanks for reading!
Steve.
Comments
Reply